Extending BPMN.js: Adding Custom Properties
Imam Setiawan
28 January, 2025

Business process automation has become a cornerstone of modern enterprises. Tools that allow organizations to model and optimize workflows have dramatically increased efficiency and transparency. Among such tools, BPMN editors stand out as an industry standard for visualizing and managing business processes. But what if your BPMN editor could go beyond just modeling processes? Imagine it generating AI-powered documentation for each node or seamlessly integrating with your organizational structure to assign predefined roles.
Our app, AlurKerja, does exactly that. We’ve taken the power of BPMN.js and extended it with innovative custom properties, enabling users to:
-
Generate AI-Driven Documentation for each BPMN node, making it easier to understand and communicate workflows.
-
Assign Organizational Roles to specific tasks, ensuring alignment with the company’s hierarchy and accountability framework.
But at this time we will not implement it yet. For starting, we will do basic where this article walks you through the technical steps to achieve simple customization in BPMN.js so you can bring similar advanced capabilities to your own applications.
This article will guide you through the steps to implement a custom properties panel in bpmn-js, including how to add new fields and link html input element to it. We will use BPMN Camunda 7 for this example. Before getting started, make sure the project is already setup with bpmn-js. Read this walkthrough to start setup bpmn-js.
Then we will extend the properties panel to allow editing a magic:spell property on all BPMN base element — all kind notation that exists in BPMN diagram. To achieve that we will walk through the following steps:
- Add properties panel library
- Add custom properties provider
- Add a group called “Black Magic” to contain the property
- Add a “spell” text input field entry to this group
- Create a new moddle extension
The property magic:spell will be persisted as an extension as part of the BPMN 2.0 document xml:
<?xml version="1.0" encoding="UTF-8"?>
<bpmn2:definitions ... xmlns:magic="http://magic" id="sample-diagram">
  <bpmn2:process id="Process_1">
    <bpmn2:startEvent id="StartEvent_1" magic:spell="WOOO ZAAAA" />
  </bpmn2:process>
  ...
</bpmn2:definitions>
Step 1: Add Properties Panel Library
Add the properties panel together with @bpmn-io/properties-panel to your project:
npm install --save bpmn-js-properties-panel @bpmn-io/properties-panel
bpmn-js-properties-panel is used for display properties panel container and its default properties that we can extend.
Import and pass it in additionalModules props of BpmnModeler init instance config.
import BpmnModeler from "bpmn-js/lib/Modeler";
import {
    BpmnPropertiesPanelModule,
    BpmnPropertiesProviderModule
} from "bpmn-js-properties-panel";

const bpmnModeler = new BpmnModeler({
  container: '#canvas',
  propertiesPanel: {
    parent: '#properties',
  },
  additionalModules: [
    BpmnPropertiesPanelModule,
    BpmnPropertiesProviderModule
  ]
});
Step 2: Add custom properties provider
The first step to a custom property is to create your own PropertiesProvider . The provider defines which properties are available and how they are organized in the panel using tabs, groups and input elements.
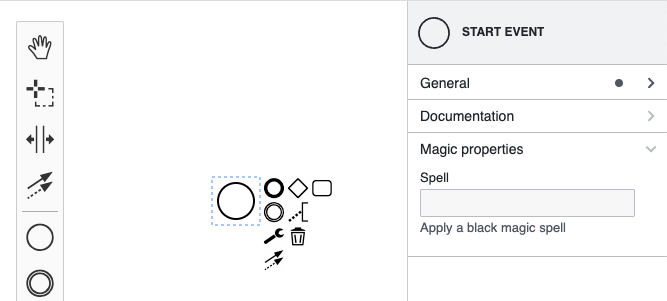
We created the MagicPropertiesProvider which exposes the "magic" group on top of the existing BPMN properties. Note that we make sure that the group is shown on every selected node.
function MagicPropertiesProvider(propertiesPanel, translate) {

  // Register our custom magic properties provider.
  // Use a lower priority to ensure it is loaded after the basic BPMN properties.
  propertiesPanel.registerProvider(LOW_PRIORITY, this);

  ...

  this.getGroups = function(element) {

    ...

    return function(groups) {

      // Add the "magic" group
      if(is(element, 'bpmn:StartEvent')) {
        groups.push(createMagicGroup(element, translate));
      }

      return groups;
    }
  };
}
Step 3: Add group for custom property
Every property must belong to one group, so we have to create the group for it. As part of the properties provider we define the magic group:
// Import your custom property entries.
// The entry is a text input field with logic attached to create,
// update and delete the "spell" property.
import spellProps from './parts/SpellProps';

// Create the custom magic group
function createMagicGroup(element, translate) {

  // create a group called "Magic properties".
  const magicGroup = {
    id: 'magic',
    label: translate('Magic properties'),
    entries: spellProps(element),
    tooltip: translate('Make sure you know what you are doing!')
  };

  return magicGroup
}
Step 4: Add entry for input field of custom property
The “spell” entry is defined in SpellProps. We reuse TextFieldEntry to create a text field for the property. The component needs to be a Preact component. We use htm to create a Preact component from a tagged template.
import { html } from 'htm/preact';

import { TextFieldEntry, isTextFieldEntryEdited } from '@bpmn-io/properties-panel';
import { useService } from 'bpmn-js-properties-panel'

export default function(element) {

  return [
    {
      id: 'spell',
      element,
      component: Spell,
      isEdited: isTextFieldEntryEdited
    }
  ];
}

function Spell(props) {
  const { element, id } = props;

  const modeling = useService('modeling');
  const translate = useService('translate');
  const debounce = useService('debounceInput');

  const getValue = () => {
    return element.businessObject.spell || '';
  }

  const setValue = value => {
    return modeling.updateProperties(element, {
      spell: value
    });
  }

  return html`<${TextFieldEntry}
    id=${ id }
    element=${ element }
    description=${ translate('Apply a black magic spell') }
    label=${ translate('Spell') }
    getValue=${ getValue }
    setValue=${ setValue }
    debounce=${ debounce }
    tooltip=${ translate('Check available spells in the spellbook.') }
  />`
}
Step 5: Create a New Moddle Extension
The next step to create a custom property is to create a moddle extension so that moddle is aware of our new property “spell”. This is important for moddle to write and read BPMN XML containing custom properties. The extension is basically a json descriptor file magic.json containing a definition of bpmn:BaseElement#spell:
{
  "name": "Magic",
  "prefix": "magic",
  "uri": "http://magic",
  "xml": {
    "tagAlias": "lowerCase"
  },
  "associations": [],
  "types": [
    {
      "name": "MagicDocumenterEvent",
      "extends": [
        "bpmn:BaseElement"
      ],
      "properties": [
        {
          "name": "spell",
          "isAttr": true,
          "type": "String"
        },
      ]
    },
  ]
}
In this file we define the new type MagicDocumenterEvent which extends the type bpmn:BaseElement and adds the "spell" property as an attribute to it.
Finally, to ship our custom extension with the properties panel we have to wire both the moddle extension and the properties provider when creating the modeler.
import BpmnModeler from "bpmn-js/lib/Modeler";
import {
    BpmnPropertiesPanelModule,
    BpmnPropertiesProviderModule
} from "bpmn-js-properties-panel";
import magicPropertiesProviderModule from './provider/magic';
import magicModdleDescriptor from './descriptors/magic';

const bpmnModeler = new BpmnModeler({
  container: '#canvas',
  propertiesPanel: {
    parent: '#properties',
  },
  additionalModules: [
    BpmnPropertiesPanelModule,
    BpmnPropertiesProviderModule,
    magicPropertiesProviderModule
  ],
  moddleExtensions: {
    magic: magicModdleDescriptor
  }
});
That is step-by-step guide on implementing custom properties in bpmn-js. Thank you for reading.
References:
Next article


Ready to Digitally Transform Your Business Processes?
Join 100+ companies already experiencing maximum productivity